From Stitches to Masterpiece: Frames
Framing projects is a lovely way to show your efforts off, but a badly framed project can actually be as bad as not bothering at all.
Frames for embroidery and cross stitch projects need to be carefully chosen. Not every frame is suitable for this type of work, especially as they require a good deal of room. Your project is not like a photo, paper thin and able to fit every commercial frame out there, but there are good options.
First and foremost is to consider your project's size, and suitability for framing BEFORE you start your project. Too late at this point, you say, I know! But there are ways around that. Matting can help bridge the gaps between a project that is an awkward size and a commercial frame. It is a much cheaper option than having a custom frame made.
As I said in Matting, one of the nice things about using mat boards on your project, is that if you don't have a deep frame, this can help with making your frame work. You can skip the back board and yet still have a project that you don't have to fight to frame as you can use the mat board to hold it all in. Its not ideal, but it works.
Some commercial frames will come with matting in them, like mine did. I ignored it. Not only is it often a boring colour, but its also usually not the right size for my projects!
Things you will need
Your project- laced up and mounted on mat boards if you so choose
Frame
Screwdriver (optional and depends on what frame choice you have)
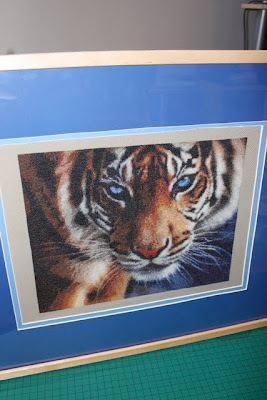
So, about those frames. As I said, not every frame out there is suitable. Flat frames are the bane of my life. But there are plenty of frames out there that have good depth. What do I mean about depth? Here's a shot-

See how the frame actually has a good bit of space between where the back board is and the edge of the frame? That's what you're looking for. Matting will add some depth to things, but most of it will come from your project. Fabric, especially Aida, is not thin, and it will add quite a bit, so if you choose a frame where the back board is already flush with the back edge of the frame, you're going to have a real tough time getting your project to stay put in it without resorting to ugliness and vast quantities of tape, which is liable to only hold for so long.
Making the right choice on your frame will make your life much easier. Look for depth and you won't go wrong. IKEA make a good line that have plenty of depth in them and are dead easy to deal with (and incidentally what I used to frame this Tiger).
 You can find good quality, appropriate and cheap frames if you look around.
Aside from that, I would also suggest looking for a colour that is complementary to your project. I personally avoid dark woods unless there are very vibrant and dark colours in my project, but that's mostly personal choice.
The How-To
Really, this is mostly self-explanatory. Most of the work will be in selecting a good frame before you try to put it all together, but I'll run through the basics anyway.
Take your frame out of any of its packaging and put your frame face down.
 Remove anything on the back of your frame so the back of the glass is exposed.
If you're using mat boards, put the first one right side down. Layer the rest of your mat boards face down until you get to your project's layer, making certain each is placed face down.
If you're not using mat boards, just place your project face down on the glass.

 Add the backing board. Note: I suggest NOT using your back board as your lacing board, even if you aren't using mat boards. Having a back board is an easy to way to cover up any mistakes that are on the back, and it makes it much less likely that your lacing threads will fray or get caught on something and snap when you try to hang it up.
Also, if you don't have a deep frame, but are willing to use mat boards, you can get away with the lack of depth by using the mat board to secure your project, skipping the back board. Not ideal, but if your heart is set on a frame that won't work otherwise, it can certainly be an option.
If instructions came with your frame, I suggest following them as best as possible from here on out. If not, you want to secure your project and all the layers so that it will not move back and forth or up and down.
Those little metal tags? Start by pressing them down onto your back board. You want these nice and tight, so I usually will do more than just press by them hand. In this case- those are my "bad" scissors that I used to just push them down.
 You can, at this point, be done! However, I prefer things to be a little bit more secure than that, so I usually go for frames that come with more options.
In this case, my frame had some brackets and screws. These are very easy to put in, and no, you can't screw it up as long as its provided by the manufacturer- as in, the screws will not be long enough to go through the side.
Simply put the bracket so that it is pressing down on the back board, and screw it in. Or get a hunky boyfriend or husband to screw it in. (I've found them to be much more interested in what I'm doing once I bring out the screwdrivers. But anyway-)

You should end up with is a nice tight frame that if you shake it gently you don't see any sliding of your project or the mat boards.
If wire is provided, its a nice way to hang- simply attach the wire to two screws on either side and pull the wire relatively tight. Secure it well, and you can hang it on the nail.

I'm not going to go into the ins and outs of hanging a picture, but I am going to congratulate you on making this far, at which point, you should have a beautiful project hanging on your wall!

Frames for embroidery and cross stitch projects need to be carefully chosen. Not every frame is suitable for this type of work, especially as they require a good deal of room. Your project is not like a photo, paper thin and able to fit every commercial frame out there, but there are good options.
First and foremost is to consider your project's size, and suitability for framing BEFORE you start your project. Too late at this point, you say, I know! But there are ways around that. Matting can help bridge the gaps between a project that is an awkward size and a commercial frame. It is a much cheaper option than having a custom frame made.
As I said in Matting, one of the nice things about using mat boards on your project, is that if you don't have a deep frame, this can help with making your frame work. You can skip the back board and yet still have a project that you don't have to fight to frame as you can use the mat board to hold it all in. Its not ideal, but it works.
Some commercial frames will come with matting in them, like mine did. I ignored it. Not only is it often a boring colour, but its also usually not the right size for my projects!
Things you will need
Your project- laced up and mounted on mat boards if you so choose
Frame
Screwdriver (optional and depends on what frame choice you have)
So, about those frames. As I said, not every frame out there is suitable. Flat frames are the bane of my life. But there are plenty of frames out there that have good depth. What do I mean about depth? Here's a shot-

See how the frame actually has a good bit of space between where the back board is and the edge of the frame? That's what you're looking for. Matting will add some depth to things, but most of it will come from your project. Fabric, especially Aida, is not thin, and it will add quite a bit, so if you choose a frame where the back board is already flush with the back edge of the frame, you're going to have a real tough time getting your project to stay put in it without resorting to ugliness and vast quantities of tape, which is liable to only hold for so long.
Making the right choice on your frame will make your life much easier. Look for depth and you won't go wrong. IKEA make a good line that have plenty of depth in them and are dead easy to deal with (and incidentally what I used to frame this Tiger).

Aside from that, I would also suggest looking for a colour that is complementary to your project. I personally avoid dark woods unless there are very vibrant and dark colours in my project, but that's mostly personal choice.
The How-To
Really, this is mostly self-explanatory. Most of the work will be in selecting a good frame before you try to put it all together, but I'll run through the basics anyway.
Take your frame out of any of its packaging and put your frame face down.

If you're using mat boards, put the first one right side down. Layer the rest of your mat boards face down until you get to your project's layer, making certain each is placed face down.
If you're not using mat boards, just place your project face down on the glass.

Most frames have these little metal tags that stick out along the side. Try to make certain that any part of your project and the back board goes in so that these are still sticking out.

Also, if you don't have a deep frame, but are willing to use mat boards, you can get away with the lack of depth by using the mat board to secure your project, skipping the back board. Not ideal, but if your heart is set on a frame that won't work otherwise, it can certainly be an option.
If instructions came with your frame, I suggest following them as best as possible from here on out. If not, you want to secure your project and all the layers so that it will not move back and forth or up and down.
Those little metal tags? Start by pressing them down onto your back board. You want these nice and tight, so I usually will do more than just press by them hand. In this case- those are my "bad" scissors that I used to just push them down.

In this case, my frame had some brackets and screws. These are very easy to put in, and no, you can't screw it up as long as its provided by the manufacturer- as in, the screws will not be long enough to go through the side.

You should end up with is a nice tight frame that if you shake it gently you don't see any sliding of your project or the mat boards.
If wire is provided, its a nice way to hang- simply attach the wire to two screws on either side and pull the wire relatively tight. Secure it well, and you can hang it on the nail.

I'm not going to go into the ins and outs of hanging a picture, but I am going to congratulate you on making this far, at which point, you should have a beautiful project hanging on your wall!

Hi I just have a quick question. I bought some of those frames from Ikea. But I found that even thou the frame is deep enough the metal clips are still to close to the frame. Did you find that there was enough room to put your fabric in and put the clips down to hold it?
ReplyDeleteI'm not 100% sure what you're getting at. I had no real problem with it. It was difficult to press down the metal tabs without using something other than my finger (as I used the scissors in the pics), but other than that I had no issues with it. There was tons of room for my fabric because I had matted my project. Even with two mat boards, the tabs folded over fine. Then, because those clips hold the mat boards close to the front of the frame, there's about an inch of back space that the excess fabric can sit in.
DeleteRemember that the clips don't have to press all the way down to where they are inserted. They just have to press down enough to hold the project in without slipping.
Hi, I tend to live in high humidity places, and a long time ago a professional framer told me that I either needed to have plenty of space between the project and the glass (in case moisture gets in there) or not use glass at all. My projects are almost always gifts, and so I can't account for where they end up ( if the sun is on them or they have a dehumidifier etc). My question is this, does the mat provide enough of a space between the project and the glass to prevent condensation? I've been mounting my projects mostly in frames that don't have glass (or just not using the glass), but I've got a few big ones coming up that I think would look better in glass. I'm probably going to get them professionally framed, but I'm curious anyways.
ReplyDeleteI love your blog, was linked to it from sprite stitch a few days ago!
Thanks!
Hi Torene, glad you like it!
DeleteI have lived in both high and low humidity places and I've never had any problem with condensation. I double my matting (use two colours) as it looks prettier usually. Certainly my Tiger, which has only ever lived in Ireland, has had no issues. You can always consider using spacers if you're really concerned about it.
I would follow a professional framers advice though for a specific project if you're getting it done through them. The reality is that what works could change depending on the frame and materials chosen.